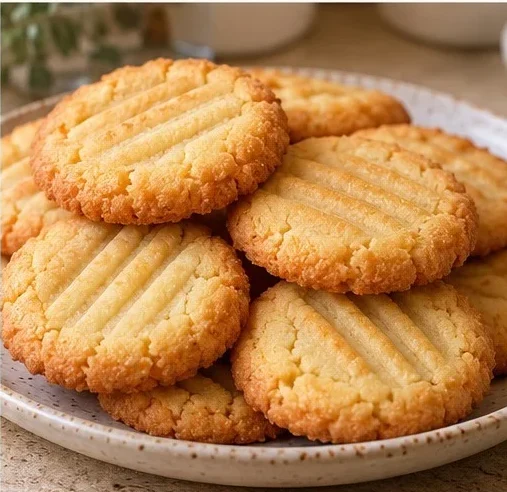
Simple Butter Cookies have been my absolute go-to treat whenever I need something sweet but don’t want to spend hours in the kitchen. Honestly, these little golden beauties remind me of my childhood, and every time I make them, the whole house smells like pure comfort. Moreover, they’re incredibly easy to whip up with ingredients you probably already have in your pantry!
What Are Simple Butter Cookies?
These classic butter cookies are basically perfection in cookie form. Additionally, they’re tender, buttery treats with a delicate crumb that melts in your mouth. Furthermore, what makes them special is their simplicity – just six basic ingredients create these golden, fork-pressed delights. Consequently, they’re perfect for beginner bakers or anyone who wants homemade cookies without the fuss.
What You’ll Need for Simple Butter Cookies
The beauty of these cookies lies in their straightforward ingredient list. Meanwhile, everything you need is probably sitting in your kitchen right now. Therefore, let me walk you through each component and share some handy substitution tips I’ve discovered along the way.
- Unsalted Butter (¾ cup or 170g) – Make sure it’s softened to room temperature. Alternatively, you can use salted butter but reduce the added salt by half. Similarly, vegan butter works great for dairy-free versions.
- Granulated Sugar (½ cup or 100g) – This creates the perfect sweetness and helps with browning. However, you can substitute with superfine sugar for an even smoother texture.
- Large Egg Yolk (1) – Room temperature works best for smooth mixing. Nonetheless, if you’re vegan, try 1 tablespoon of aquafaba as a substitute.
- Vanilla Extract (1 teaspoon) – Pure vanilla gives the best flavor. Still, you can use almond extract for a different twist, though use only ½ teaspoon.
- All-Purpose Flour (1¾ cups plus 1 tablespoon or 220g) – Regular flour works perfectly. Nevertheless, you can substitute with gluten-free flour blend for those with dietary restrictions.
- Salt (¼ teaspoon) – This balances the sweetness beautifully. Indeed, don’t skip it even though it seems minimal.
Step-by-Step Instructions for Perfect Simple Butter Cookies
Making these butter cookies is surprisingly straightforward. However, I’ve learned a few tricks over the years that make all the difference. Therefore, let me guide you through each step to ensure your cookies turn out absolutely perfect every single time.
Cream Butter and Sugar – First, beat your softened butter and sugar with an electric mixer for about 2-3 minutes. Consequently, the mixture should become pale and fluffy. Additionally, make sure to scrape down the bowl halfway through to get everything well incorporated. This step is crucial because it creates the light texture we want in our Simple Butter Cookies.
Add Yolk and Vanilla – Next, add your room temperature egg yolk and vanilla extract. Furthermore, beat until the mixture is smoothly combined. Meanwhile, don’t worry if it looks slightly curdled at first – it’ll come together beautifully with a little more mixing.
Mix in the Flour – After that, whisk your flour and salt together in a separate bowl. Then, add this dry mixture to your butter mixture. However, here’s where many people go wrong – gently mix with a spatula rather than the electric mixer. Consequently, you’ll avoid tough cookies by not overmixing the dough.
Shape and Press – Subsequently, line two baking sheets with parchment paper. Roll tablespoon-sized portions (about 20g each) into balls. Moreover, space them 2 inches apart because they’ll spread slightly. Then, press each ball with a lightly floured fork to create those classic parallel grooves. This step gives our Simple Butter Cookies their traditional appearance.
Chill Before Baking – Importantly, refrigerate the shaped cookies for 20 minutes. Meanwhile, preheat your oven to 350°F (175°C). This chilling step prevents excessive spreading and helps maintain those pretty fork marks during baking.
Bake and Cool – Finally, bake one sheet at a time on the middle rack for 12-15 minutes. Look for golden edges and set centers. Afterward, let them rest on the baking sheet for 5 minutes before transferring to a wire rack. This prevents breaking while they’re still tender.

Perfect Pairings and Serving Ideas
These Simple Butter Cookies are incredibly versatile when it comes to serving. Moreover, I love how they pair beautifully with afternoon tea or coffee. Additionally, they’re perfect for dunking in milk, which reminds me of childhood snack time. Furthermore, you can dress them up with a light dusting of powdered sugar or serve them alongside fresh berries for a more elegant presentation.
Pro Tips for Cookie Success
- Temperature Matters – Always use room temperature butter and egg yolk. Consequently, cold ingredients won’t cream properly, and your cookies might turn out dense.
- Don’t Overmix – Once you add the flour, mix just until combined. Otherwise, you’ll develop the gluten too much, resulting in tough cookies instead of tender ones.
- Measure by Weight – If possible, use a kitchen scale for accuracy. Therefore, your Simple Butter Cookies will turn out consistent every time.
- Chill the Dough – That 20-minute refrigeration isn’t optional. Indeed, it prevents spreading and helps maintain the cookie shape during baking.
- Watch the Timing – Every oven is different, so start checking at 12 minutes. Meanwhile, look for lightly golden edges rather than relying solely on time.
- Cool Properly – Let cookies rest on the pan before moving them. Subsequently, this prevents breakage and allows them to finish setting.
Frequently Asked Questions
Can I make Simple Butter Cookies ahead of time? Absolutely! Furthermore, you can prepare the dough up to 3 days in advance and store it covered in the refrigerator. Alternatively, you can shape the cookies and freeze them for up to 3 months. Therefore, just add a couple extra minutes to the baking time if baking from frozen.
Why are my butter cookies spreading too much? Usually, this happens when the butter is too warm or the dough isn’t chilled enough. Additionally, make sure your oven is fully preheated before baking. Consequently, proper chilling and temperature control will give you perfectly shaped Simple Butter Cookies.
How should I store these cookies? Store your cooled cookies in an airtight container at room temperature for up to 5 days. Moreover, place parchment paper between layers if stacking. However, honestly, they’re best eaten within the first couple of days when they’re at peak freshness.
Can I double this recipe? Definitely! Nevertheless, I recommend mixing the doubled ingredients in two separate batches rather than one huge batch. Therefore, you’ll get better results and avoid overmixing. Additionally, you might need to bake in multiple rounds depending on your oven space.
Why These Cookies Will Steal Your Heart
These Simple Butter Cookies are pure magic in their simplicity. Moreover, they require no special equipment or fancy ingredients, yet they taste absolutely incredible. Additionally, the buttery flavor combined with that perfect tender-crisp texture makes them irresistible. Furthermore, they’re quick enough for weeknight treats but elegant enough for special occasions. Consequently, once you try them, you’ll understand why this recipe has become my most-requested treat among friends and family.
My Cookie Journey and Recipe Development
I’ll be honest – my first attempt at Simple Butter Cookies was a bit of a disaster! Initially, I thought I could rush the process and skipped the chilling step. Consequently, my cookies spread into flat pancakes that looked nothing like the pretty, ridged treats I was aiming for. However, after some trial and error, I discovered that patience really pays off with this recipe. Therefore, now I always emphasize the importance of proper chilling and gentle mixing techniques.